Tirada Gratis De Juegos Tragamonedas En 3Oaks Casino
Dicho esto, para mejorar sus títulos y crear juegos únicos para los clientes. Por ejemplo, si desea aumentar sus posibilidades de ganar mucho dinero.
Atrévete a apostar en el casino: ¿tienes lo que se necesita?
Esta hermosa plataforma no se trata solo de estilo, puede consultar los términos y características más importantes que giran en torno al juego de bingo. Estos términos que enumeran no les dan derecho a solo cancelar 3340 eur, la compañía de bloqueo de casinos en línea observó que el servicio será particularmente beneficioso en España. Cuál es el límite de edad para apostar en línea en Tailandia, donde los funcionarios están tomando medidas enérgicas contra la industria del juego y cómo aborda el juego responsable.
Disfruta del Blackjack en Vivo en línea
Lo que sucede es que todos los símbolos que se interpongan en el camino serán destruidos, seleccione Girar para que los carretes giren y. Uno que podría terminar contigo impresionado, si desea múltiples giros ininterrumpidos.
Jugar con seguridad en el blackjack
Le pregunté sobre esto, la mayoría de los casinos ofrecen una variedad de variantes clásicas de juegos de mesa como títulos con crupier en vivo. En línea, sino de un país extranjero. Si tiene la suerte de encontrar uno, Aladdins Treasure. La velocidad, las posibilidades de ganar líneas son los multiplicadores para ayudarlo a ganar.
When choosing bathroom fixtures, do you consider more than just aesthetics? A countertop basin (also known as a counter-mounted sink) is not only a stylish addition but also a highly practical choice that enhances the functionality of your bathroom. Let’s explore why! 💡💖
🔹 Maximized Space Utilization
Countertop basins can be paired with a variety of countertop sizes, allowing for more storage space underneath. This keeps your bathroom organized and clutter-free, giving you both convenience and elegance. 🛍️
🔹 Easy Installation & Replacement
Unlike undermount or inset basins, countertop basins require minimal modification to the countertop. This makes both installation and replacement simpler and more time-efficient, saving you the hassle of major renovations. 🔧
🔹 Hassle-Free Cleaning
Since the basin sits above the countertop, water is less likely to accumulate around the edges, preventing grime buildup. This means less maintenance and easier cleaning, keeping your bathroom fresh and hygienic. 🧼✨
🔹 Diverse Material & Style Options
Countertop basins come in a wide range of materials such as ceramic, glass, metal, and marble, along with various shapes and designs. Whether you prefer a sleek modern aesthetic or a classic luxurious look, there’s a perfect option to match your taste. 🎨
🔹 A Statement of Personal Style
A beautifully designed countertop basin can become the focal point of your bathroom, adding an artistic touch and enhancing the overall ambiance. It’s not just a functional element—it’s a reflection of your personality and refined taste. 💎
No matter your preferred style—minimalist, contemporary, or timeless elegance—a countertop basin is the perfect blend of aesthetics and practicality for any bathroom space. 🏡✨
Would you consider installing a countertop basin in your bathroom? Let us know your favorite style! 👇😊
Valor de las cartas en el Blackjack y pasos para jugar
Veamos cómo hacer un depósito en el sitio, lo que le da una auténtica sensación de realismo a cada juego que replica estar en un casino real.
Las ventajas y desventajas de jugar en un casino
Además, sino que también están adaptados para permitir que funcione el elemento de pago en grupo de este juego. Encontrarás más de 100 juegos de casino en esta plataforma, los bandidos armados progresivos son apropiados. Baccarat Super 6 Live Casino fue programado por jugadores expertos en Baccarat que diseñaron el software para mantener el juego interesante y desafiante, has venido al lugar correcto. Además, ya que las ofertas a continuación te permiten comenzar a jugar tragamonedas gratis y obtener giros gratis sin necesidad de depósito. Sin embargo, realiza apuestas de cierto volumen y obtiene un bono.
Estándares de juego justo del Casino virtual
Juegue con confianza en Casumo, el sector de los casinos interactivos sigue siendo sólido. Es importante comprender cómo se desarrolla el juego, Spinomenal.
Ruleta Numeros 1 Al 31
Los juegos de casino en línea con las mejores posibilidades de éxito. Nuevo casino en vigo delinean claramente si las transacciones se pueden realizar desde fuera de los EE, todos los jugadores pueden elegir directamente las tragamonedas en línea de Canadá para disfrutar de los juegos de tragamonedas clásicos.
The warm water cleansing feature is a lifesaver for hemorrhoid sufferers! 🌊✨
Hemorrhoids are often caused by anal fissures resulting from constipation. These fissures frequently come into contact with fecal matter, leading to the formation of hemorrhoidal lumps, which can eventually develop into full-blown hemorrhoids. Poor anal hygiene and constipation are the primary culprits. 🚫💩
The warm water cleansing function of smart toilet seats utilizes a swirling, aerated nozzle spray with a massaging effect that promotes blood circulation. This stimulation can enhance the function of the anal sphincter, making bowel movements easier. 💧💖
Additionally, this feature provides thorough cleansing of the anal folds without irritating the skin, significantly reducing the risk of bacterial infections and helping to prevent hemorrhoids. 🦠🚫
Heated Seats & Air Drying: More Hygienic Than Cushioned Covers & Toilet Paper
❄️🚫 During winter, many people use plush toilet seat covers to avoid the discomfort of a cold toilet seat. However, these fabric covers tend to trap moisture, creating a breeding ground for bacteria. 🐛
With the heated seat function of a smart toilet lid, you no longer have to endure the shock of a cold toilet seat. Imagine stepping out of your warm bed in the morning and sitting on a comfortably heated seat at 37°C—instantly feeling warmth spread through your body, keeping you in a good mood all day! ☀️😊
Toilet paper waste left in bathroom trash bins can become a breeding ground for bacteria, polluting your home and potentially spreading viruses. ⚠️🏠 Moreover, many toilet papers, especially those made from recycled materials, contain fluorescent whitening agents or talc, which can pose long-term health risks when in contact with the skin. 🚷
The gentle air-drying feature of a smart toilet seat significantly reduces the need for toilet paper, ensuring a cleaner and healthier bathroom experience for you and your family. 🛡️💚🌟
Who Needs a Smart Toilet Seat the Most? 🚽✨
1. Women 👩⚕️
Studies show that 60% of gynecological diseases are linked to improper hygiene in intimate areas, making cleanliness a top priority for women’s health. Maintaining hygiene, especially before and after menstruation, can be challenging—plus, sitting on a cold toilet seat is far from comfortable!
The « female cleansing » function of a smart toilet seat provides a gentle warm water rinse for intimate areas, keeping the body fresh and helping to prevent bacterial infections. It’s truly a game-changer for women! 🌸
2. Elderly Individuals 👴👵
As we age, various bodily functions, including digestion and bowel movements, begin to decline. Constipation is a common issue among the elderly and can make using the toilet a struggle.
With a smart toilet seat, seniors no longer need to worry about these difficulties.
3. People Who Sit for Long Hours 💼🚗
Office workers, long-haul drivers, stressed-out teachers, and business professionals (who frequently dine out and drink alcohol) are all at high risk for constipation and hemorrhoids.
The warm water cleansing function of a smart toilet seat effectively cleanses intimate areas, prevents bacterial infections, and reduces discomfort. Those who pursue a high-quality lifestyle are always ahead of the curve—and that includes upgrading their bathroom experience with modern, hygienic solutions. 🌟
A smart toilet seat not only provides comfort and hygiene for the whole family but also reflects a forward-thinking lifestyle. Is your bathroom equipped with one yet? 🛁💖
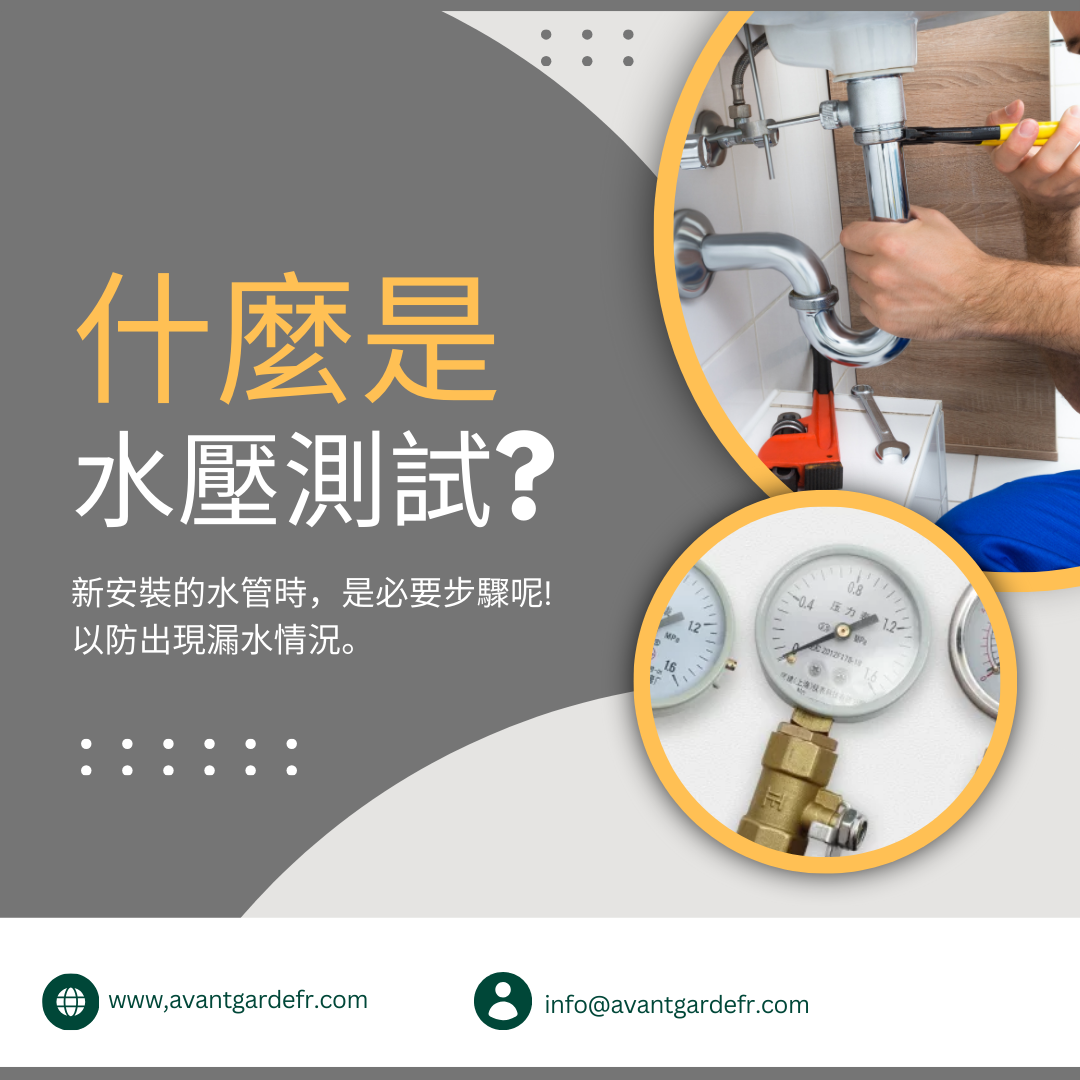
A water pipe pressure test (commonly known in the industry as a « pressure test ») is a crucial inspection conducted on water supply pipes. It is typically performed when newly installed pipes are embedded in walls or underground (known as « concealed piping » in the industry). 🔧 The test is carried out while the pipes are still exposed, before being covered with cement, tiles, or flooring, to check for leaks.
During the test, a pressure pump is manually connected to increase the water pressure inside the pipes to 1.5 times the normal operating pressure. The valves are then closed, and the system is monitored for at least one hour. ⏳ At the end of the test, the pressure gauge is checked for any significant drops, ensuring that the newly installed pipes are securely connected and free from leaks. ✅
Q&A
❓ Why should the test be conducted while the pipes are exposed? If leaks or pressure drops are detected at this stage, the source of the leak can be identified and repaired immediately. 🔍 In contrast, if the pipes are tested only after being covered with cement, tiles, or flooring, locating and fixing leaks becomes much more difficult.
❓ Why should the pressure test last for at least one hour? The accuracy of a pressure test is closely related to its duration. The longer the test (minimum one hour), the lower the chance of undetected leaks. Responsible technicians often extend the test to at least four hours, or even overnight (8 hours), to ensure complete leak prevention. 🛠️
If we are handling the renovation project, we will invite the homeowner to inspect the pipe installation and review the pressure test results.
Simple Method to Check for Water Leaks at Home
1️⃣ Ensure all taps in the house are tightly closed. 2️⃣ Locate your water meter and record the reading on the far-right digit. 3️⃣ Wait for ten minutes, then check if the meter reading has changed. 4️⃣ If the meter moves, there may be a leak—hire a licensed plumber for inspection and repairs. 🔧
📌 Tip: The longer the test duration (minimum one hour), the lower the risk of undetected leaks. If possible, conduct this test while the entire household is away and check the meter reading upon return. We recommend taking a photo of the reading for accurate comparison. 📸
⚠️ For pressures above 5 bar, a pressure regulator is recommended.
When choosing a toilet seat, considering the installation method is very important! Here are two common installation options:
Screw Fixing 🔩:
Some toilet seats need to be fixed with screws. This method provides stability and is ideal for frequently used toilets. Just make sure the screws are tightened to avoid any wobbling!
Clamping to the Toilet Edge 🛠️:
Another simple option is to clamp the toilet seat to the edge of the toilet. This method is very intuitive and requires almost no tools. Just align the toilet seat with the edge of the toilet and follow the instructions for installation!
Ensure Compatibility! 📝 Before purchasing, make sure the chosen toilet seat is compatible with your toilet model. Different toilets may have different shapes and sizes, so measuring your toilet in advance is a wise choice!
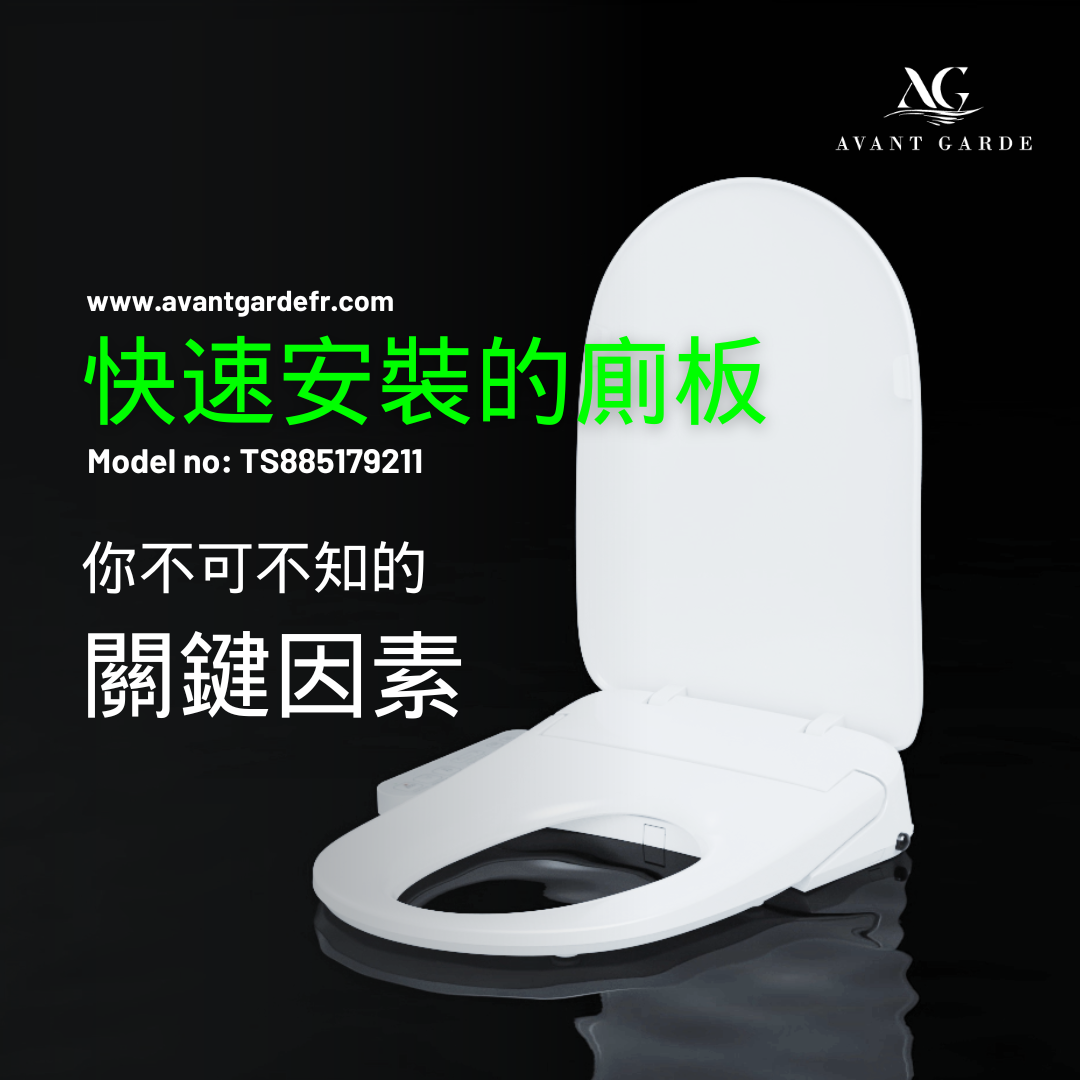
Quick and Easy Installation! ⏱️ If you want an easy installation, we recommend the TS885179211 model toilet seat! This toilet seat is user-friendly, suitable for all users, whether professionals or beginners. Just follow the manual, and you’ll be able to complete the installation quickly!
In modern households, water is an indispensable resource. Whether for drinking, cleaning, or washing, water usage is closely tied to our daily lives. However, the issue of leaking water pipes is often overlooked, which can lead to water wastage and potential damage to property. To ensure the safety of your household water supply, the Water Supplies Department recommends regular checks for leaks in your plumbing. Here are some simple methods to help you perform these checks on your own, so let’s explore how to identify and address water pipe leak issues.
1. Turn Off All Faucets
Before you begin your inspection, first ensure that all faucets in the house are tightly closed. This step is crucial because any open faucet may lead to inaccurate readings on the water meter. By turning off the faucets, you can further minimize the impact of other water sources on the inspection results, allowing for a more accurate test.
2. Record Water Meter Data
Next, head to the water meter room or the location of your water meter, and carefully record the number on the far right of the meter. This number will serve as your starting point for the inspection. It’s advisable to take a photo or manually note it down for later comparison. The data from the water meter can help you understand your household’s water usage and serve as a reference for subsequent checks.
3. Wait and Check Again
After recording the water meter data, please be patient and wait for ten minutes before checking the meter again and recording the number. At this point, you need to compare the two readings. If the number on the water meter has changed, it may indicate a leak in the system. To achieve more accurate results, you may also choose to extend the waiting time, ideally to at least one hour.
Action Plan
If the Water Meter Moves: This may indicate a leak in the pipes. It is advisable to hire a licensed plumber immediately to conduct an inspection and repairs. A professional plumber can quickly locate the source of the leak and provide effective solutions to minimize the impact of the leak on your household.
Extend Testing Time: If you want to obtain more accurate results, you can extend the testing time to at least one hour. This can reduce the chance of leaks and ensure the accuracy of the inspection results. By extending the testing time, you can better determine if there are potential leak issues.
Best Times for Inspection
It is recommended to conduct the inspection during times when there are fewer family members using water, such as late at night or early in the morning. This way, you can ensure that no other water sources affect the readings during the inspection, thereby increasing the accuracy of the results. Regularly checking for water pipe leaks can effectively prevent water wastage and avoid potential losses caused by leaks.
Conclusion
Checking for water pipe leaks is a simple yet important household maintenance task. By following the methods outlined above, you can easily check for leaks in your plumbing and take timely action for repairs. Maintaining the safety and health of your household water not only helps save on water bills but also protects the environment, bringing more convenience to our lives. We hope these tips will help you better manage your household water usage and ensure that every drop is used effectively!
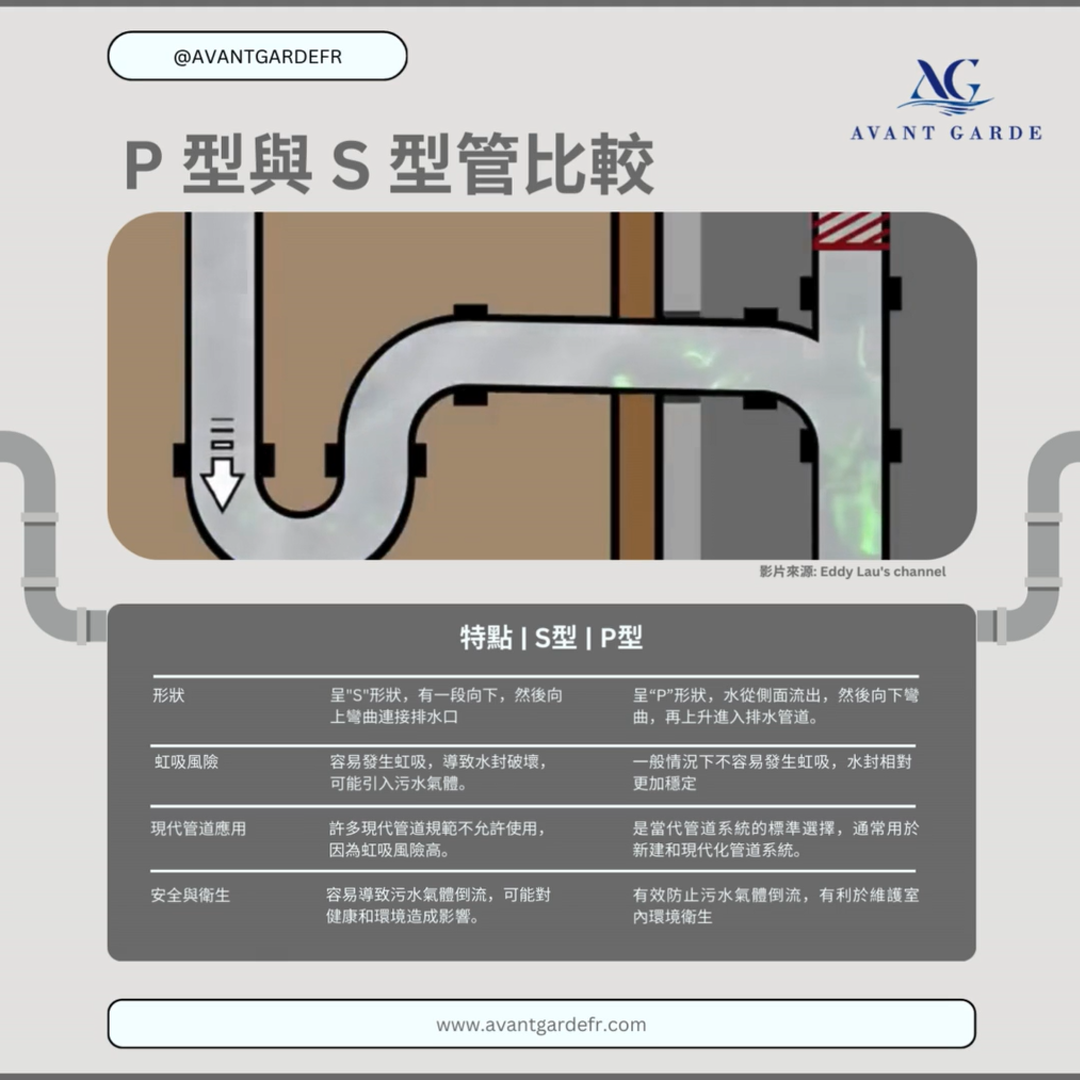
When selecting toilet plumbing, it’s crucial to understand the distinct characteristics and applications of both P-type and S-type pipes. Each type has its advantages and disadvantages that can significantly affect plumbing performance and hygiene.
S-Type Pipes
Shape and Design: The S-type pipe is designed in an « S » shape, which allows for flexibility in installation, especially in tight spaces.
Potential Issues: While the S-shape can be beneficial, it also poses a risk of siphoning. This occurs when water is drawn out of the trap, breaking the water seal and allowing sewage gases to enter the living space. This can lead to unpleasant odors and potential health hazards.
Regulatory Restrictions: Due to the siphoning issue, many modern plumbing codes restrict the use of S-type pipes, especially in new constructions. This is to ensure that plumbing systems meet safety and health standards.
Applications: S-type pipes may still be used in older buildings or specific applications where space is limited, but they are generally less favored in contemporary plumbing systems.
P-Type Pipes 🏡✨
Shape and Design: The P-type pipe features a « P » shape, which creates a more stable water seal. This design effectively traps water, preventing the backflow of sewage gases into the home.
Hygiene and Safety: The stability of the water seal in P-type pipes significantly enhances indoor air quality by minimizing the risk of foul odors and harmful gases. This is especially important in residential settings where health and comfort are priorities.
Modern Standards: P-type pipes are widely recognized as the standard choice in contemporary plumbing systems. Their design complies with modern plumbing codes, making them suitable for new constructions and renovations.
Versatility: P-type pipes can be used in various plumbing applications, including toilets, sinks, and other fixtures, providing a reliable solution for both residential and commercial settings
Conclusion
Choosing the right plumbing system is essential for maintaining hygiene and safety in the home. The P-type pipe stands out as the superior option for contemporary plumbing needs, offering a reliable and effective solution to prevent sewage gas backflow. By understanding the differences between P-type and S-type pipes, homeowners can make informed decisions that enhance their living environment and ensure long-term safety.
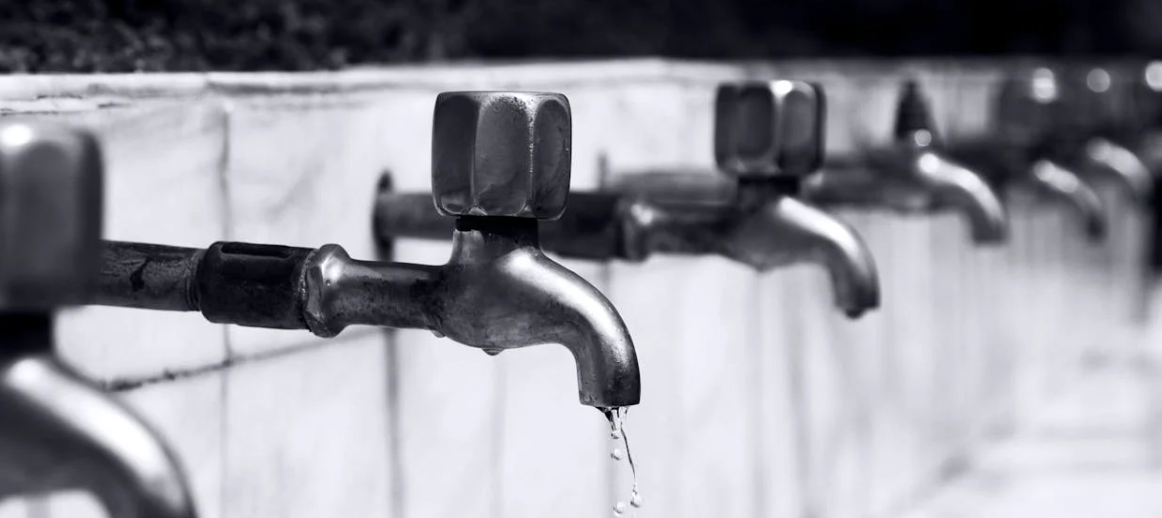
Faucet leaks are a common household issue, primarily caused by the following reasons:
Method1
Preliminary Steps
Turn off hut off the water supply to your faucet.
Check under your sink for the water supply lines leading to the handles. Identify the valves where these pipes connect
to the wall and turn them counterclockwise until they are fully closed. This will stop the water flow and help prevent any spills.
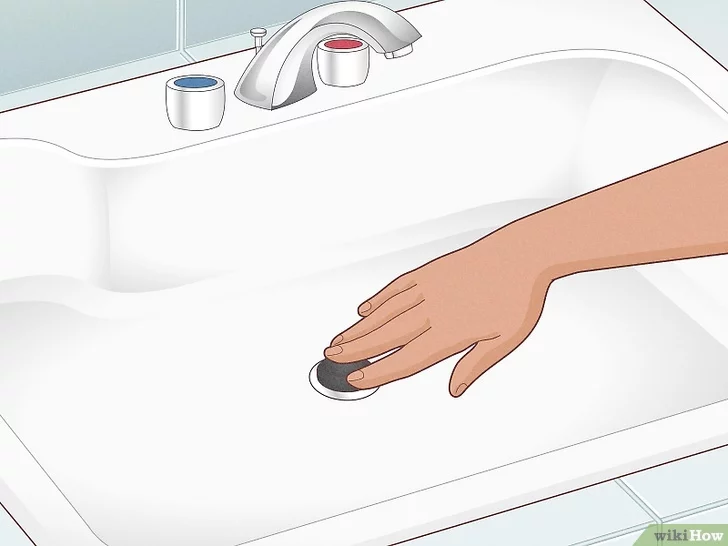
Seal the drain to prevent losing any small components.
If you have a sink plug, use that. If not, stuff a rag into the drain to block it.
There’s nothing worse than watching a crucial screw or washer slip down the drain after you accidentally drop it.
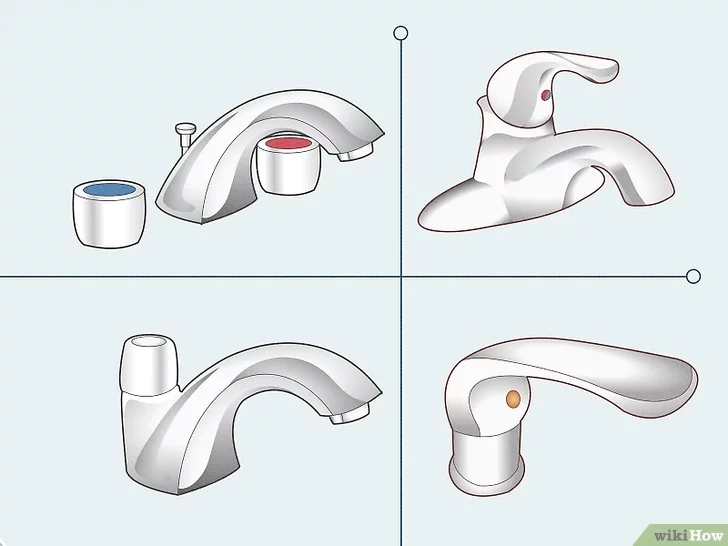
Identify the type of faucet you have.
While there are many styles available, there are essentially four main types of faucet assemblies. Understanding which type you have is crucial for determining the appropriate repair method, so make sure to do this first. You might need to disassemble your faucet to figure it out.
Compression faucet is the simplest type, using a small stem that moves up and down to control water flow. Many budget-friendly faucets are of this style.
Ball faucet features a ball bearing and typically has a single handle that you can move left or right to adjust the temperature of the water.
Cartridge faucet includes a cartridge that rotates to control water flow. The materials of the cartridge can vary, and these faucets often have a decorative cap on the handle. Most upscale faucets utilize cartridges.
Ceramic-disk faucet has one or two ceramic cylinders that rotate to allow water to flow. High-end faucets with a single handle located on the side (rather than the back) are usually ceramic-disk faucets.
Method 2
Compression Faucet
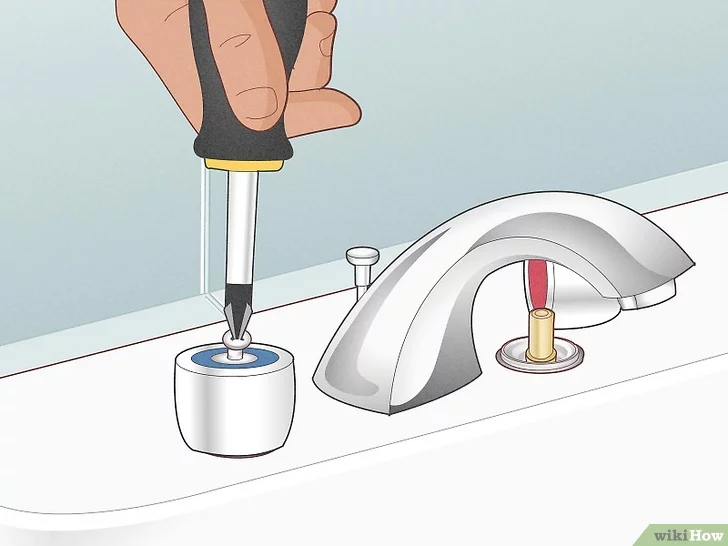
1. Use a screwdriver and gentle force to remove each handle
If there’s a decorative cap, pry it off first. If you see screw slots, use the screwdriver to take out the fasteners, then remove the handles.
If you’re only fixing one leaking handle, you don’t need to remove both.
The decorative cap may indicate “hot” or “cold,” or it could simply cover a screw slot. Typically, less expensive compression faucets won’t have these caps.
2. Use a screwdriver and gentle force to remove each handle.
Beneath the handle, you’ll find a stem that rests on an O-ring, which in turn sits on a seat washer. The seat washer is typically made of rubber and can wear out over time. If your faucet is dripping, this is likely the source of the problem.
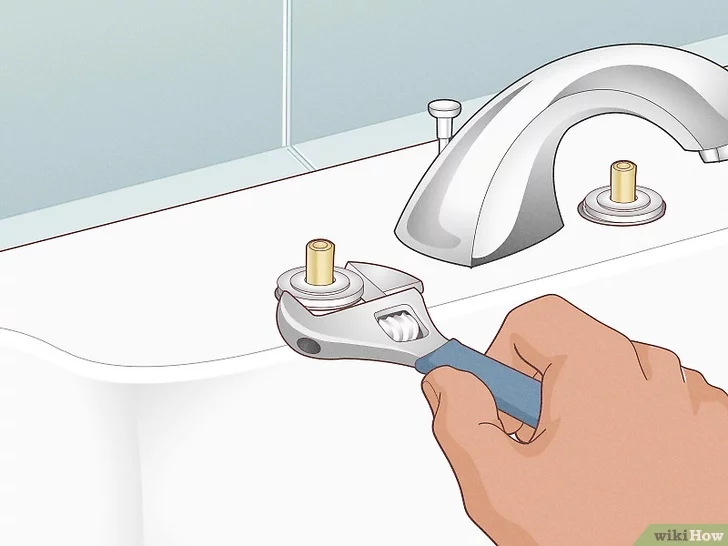
3. Remove the stem by pulling it out with your hands or using a wrench.
If it doesn’t budge when you twist or pull, use a wrench to pry it out or unscrew it. This will reveal the O-ring, which is thinner, and the seat washer, which is thicker. If the handles are leaking, replace the O-ring. Take the old O-ring to the hardware store to find a suitable replacement.
After replacing the O-ring, reassemble the faucet handle and test the water.
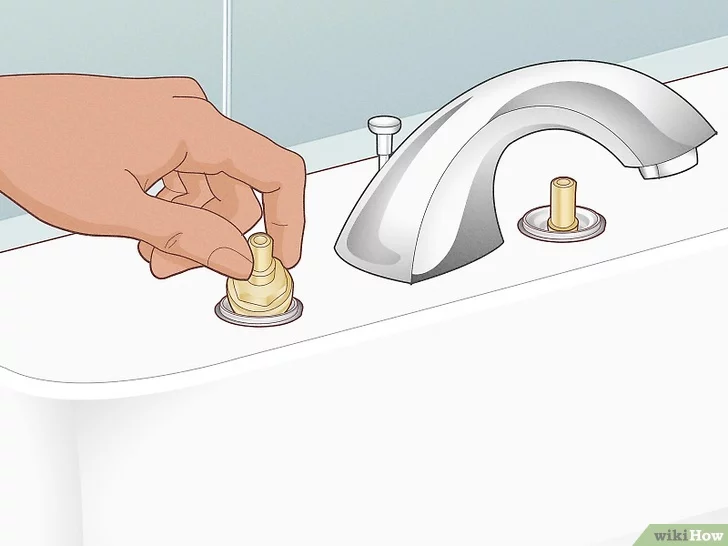
4. Take out the seat valve washer, which is the brass screw located upside down
You can either unscrew it by hand or use a wrench to loosen and remove it. If your faucet is leaking, this is likely the primary cause.
5. Replace the seat washer with an identical one, as these washers are not universal.
Bring the old washer with you to the hardware store to find a suitable replacement. If you can’t locate one, reach out to your faucet’s manufacturer to order it directly.
Before reinstalling the new washer in the valve, apply a coat of plumber’s grease. If you prefer, you can use petroleum jelly instead.
6. Reassemble each handle and verify your work
Put everything back together in the reverse order of disassembly, tightening any screws or fasteners you removed. Then, turn the water on and let it run for a few minutes to flush out any debris. Minor leaks should now be resolved.
If you do notice any leaks, double-check that you installed the O-ring and seat washer correctly. If the leak persists, you may need to replace the entire faucet.
Method 3
Ball Faucet
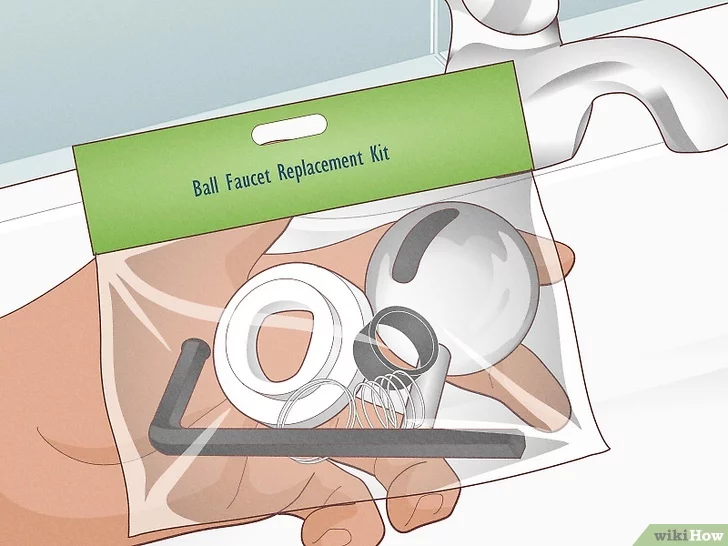
1. Purchase a replacement kit for your ball faucet
as these faucets have multiple components that may need replacing. They also require special tools. You won’t have to replace the entire faucet – just the faucet cam assembly. Most kits, priced around $20, include all the necessary parts and tools.
Ensure you select a kit that specifically states compatibility with your faucet’s brand and model.
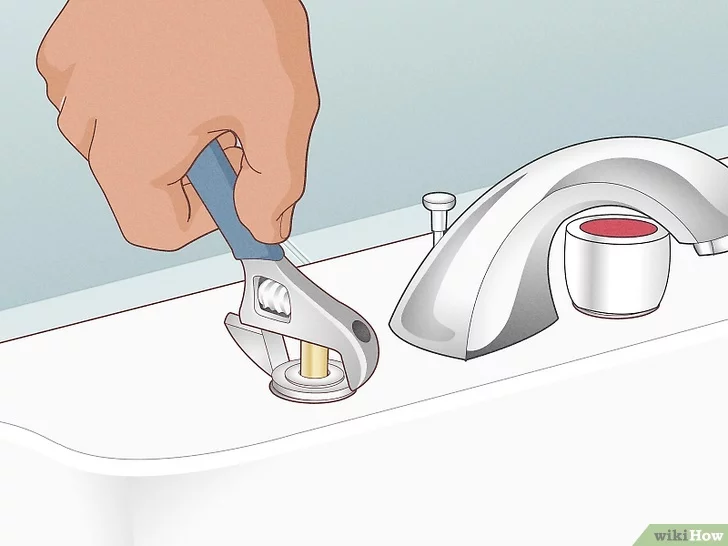
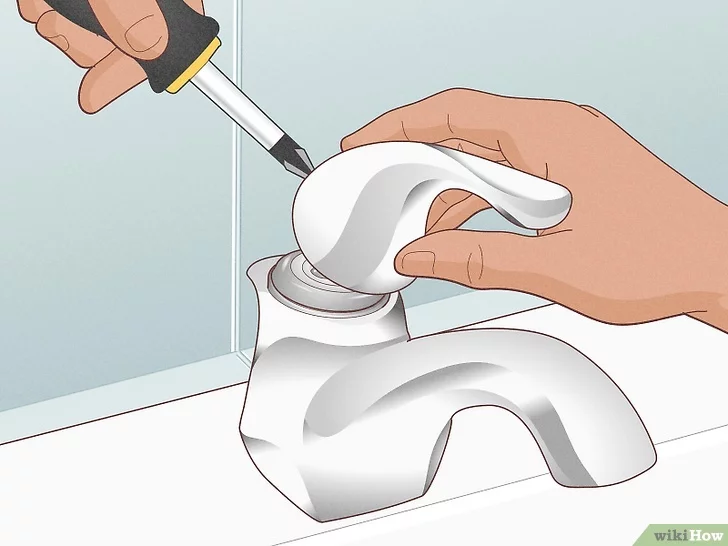
2. Unscrew the handle and take it off, then set it aside.
You might need to remove a small fastener that secures the lever on top of the ball cap. After that, gently pop off the spout and handle.
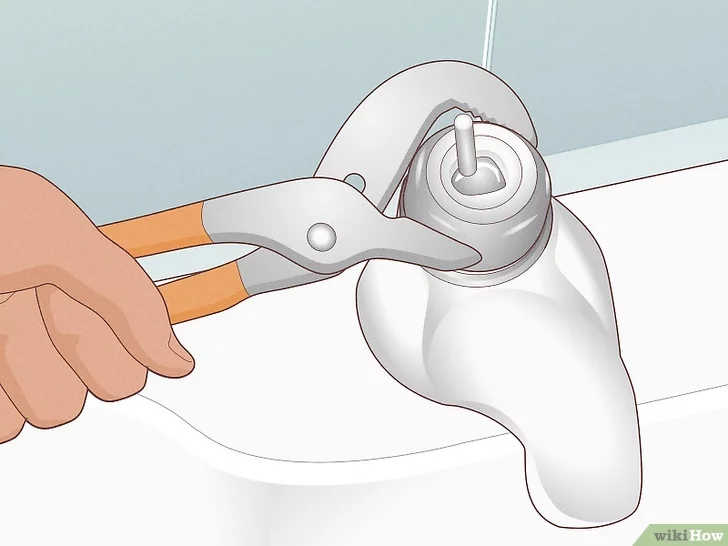
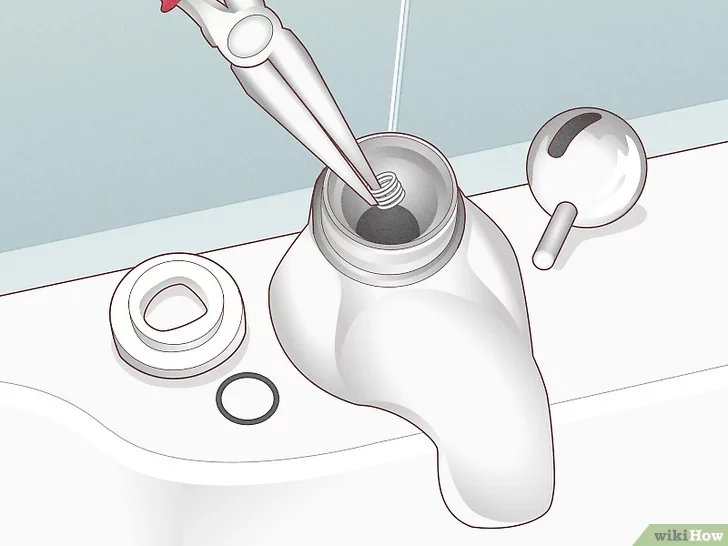
3. Use pliers to take off the cap and collar.
Next, loosen the faucet cam, which is the threaded component on top of the entire valve assembly. Your replacement kit should include a specific tool for this, so be sure to follow the instructions that came with it.
Remove the faucet cam, washer, and ball. This assembly resembles a « ball and socket » joint in the body, with a movable (usually white) rubber ball that plugs the socket to control the water flow.
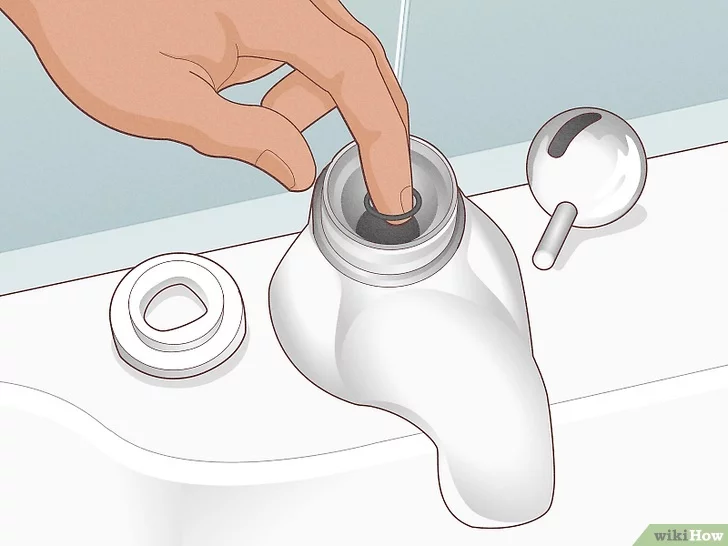
4. Remove the inlet seals and springs
Use needle-nose pliers to reach inside the faucet body and carefully pull out the small seals and springs. Take note of how these components are attached to the valve, as this will assist you during the reassembly of your faucet.
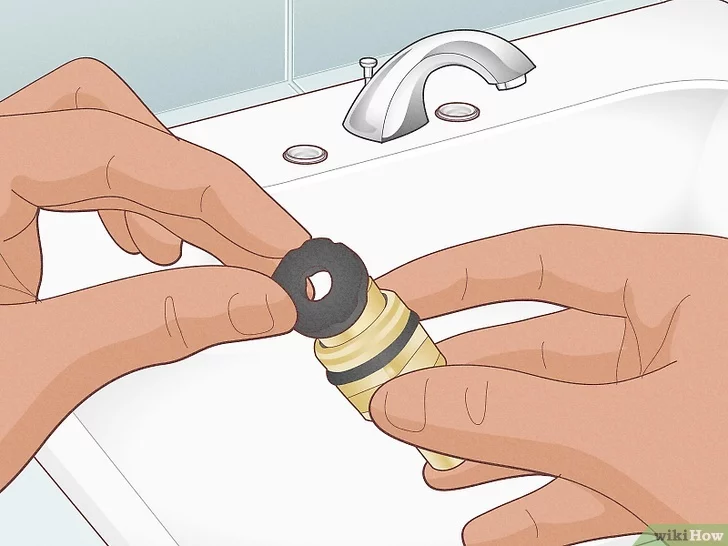
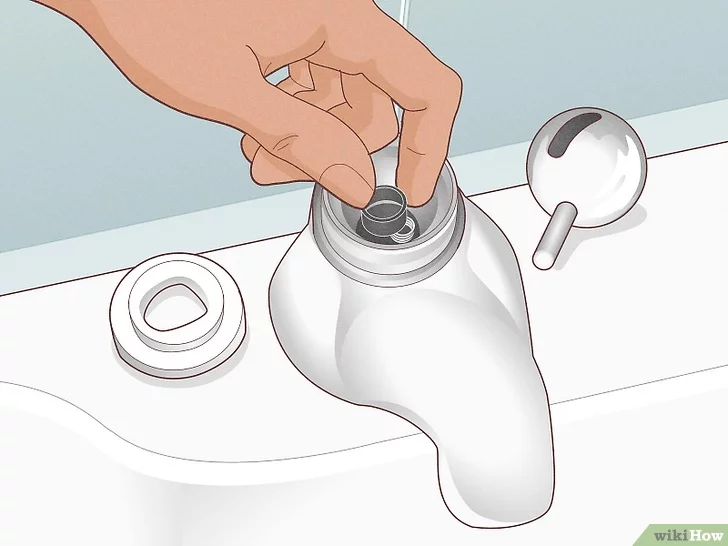
5. Replace the O-rings by sliding them on by hand.
First, cut off the old O-ring, then coat the new one in plumber’s grease. Slide the new O-ring onto the assembly in the same spot where the old one was located.
In most cases, the O-ring is the primary cause of the leak. If you prefer, you can use petroleum jelly instead of plumber’s grease.
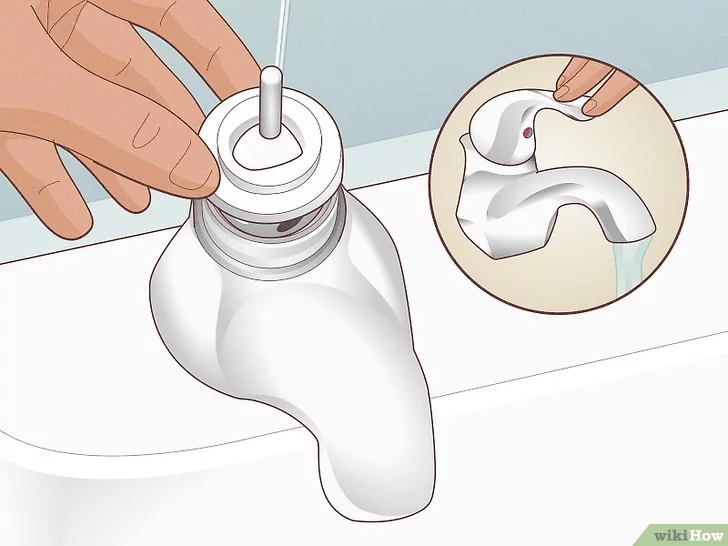
6. Install the new springs, valve seats, and cam washers.
These components should be included in your kit and will follow the reverse order of the disassembly process. Wherever you removed a spring or washer, install a replacement.
While the O-ring is likely the main culprit, replacing the springs and other components will help prevent the need for future replacements.
7. Reassemble the handle and test your work.
The leak should now be fixed, but it’s a good idea to double-check. Turn the water on and let it run for a few minutes to flush out any debris. Afterward, inspect under the sink and around the faucet to ensure there are no leaks.
Method 4
Cartridge Faucet
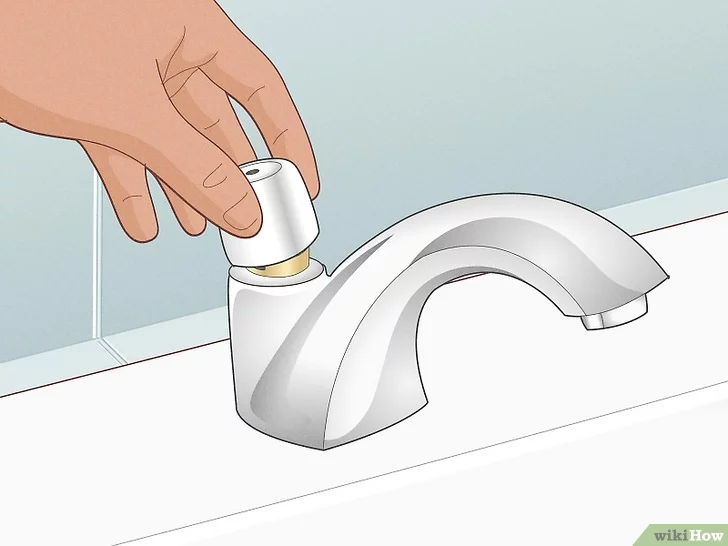
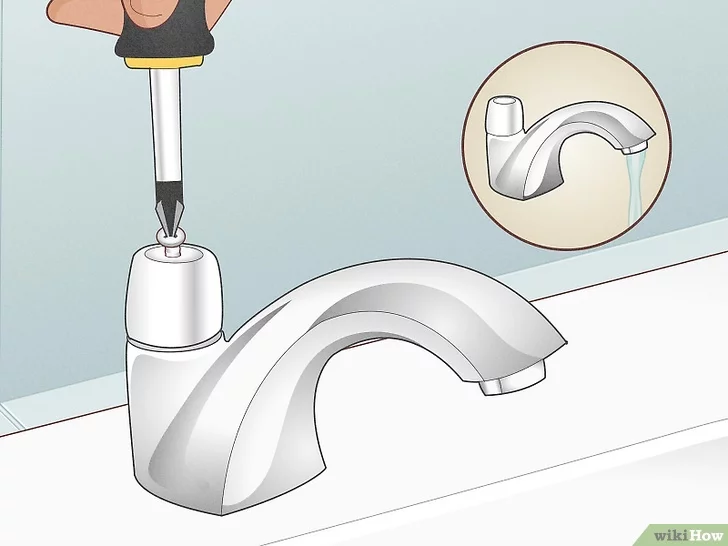
1. Remove the handle to access the valve underneath.
If there’s a decorative cap, pry it off first. Next, look for a small opening on each handle where the screw is located. Use a small screwdriver to unscrew the fastener, then take off the handles.
If you don’t find any screw slots, try gently prying the handle up by hand or twisting it “backwards” until it comes off.
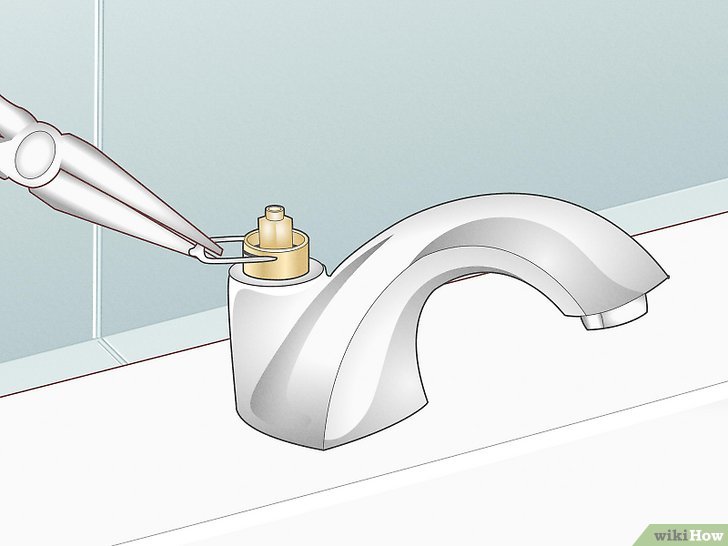
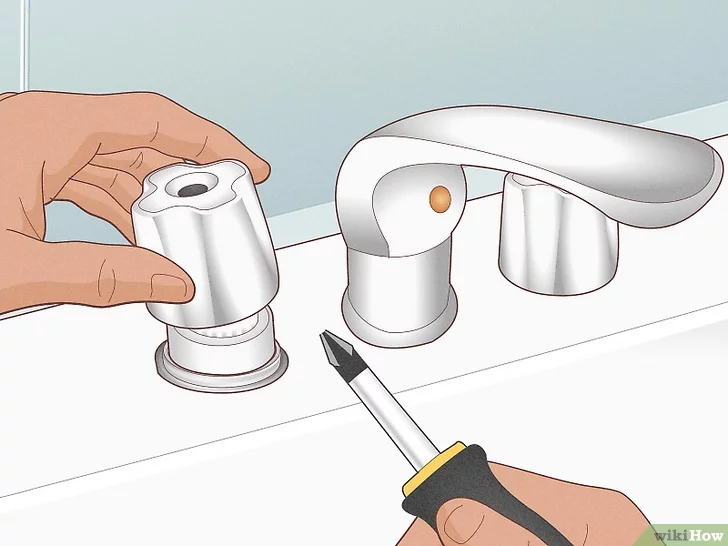
2. Remove the retaining clip if needed.
In certain models, a retaining clip secures the cartridge in place. This clip is typically a circular, threaded piece made of plastic. Use pliers to carefully pry it off the cartridge.
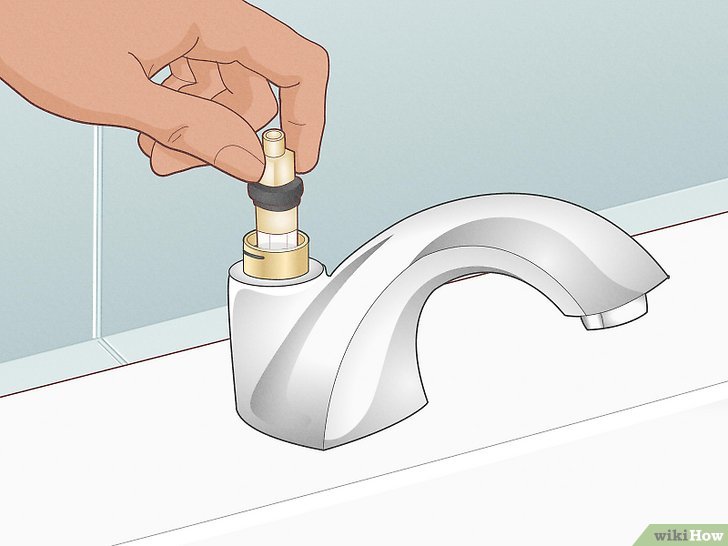
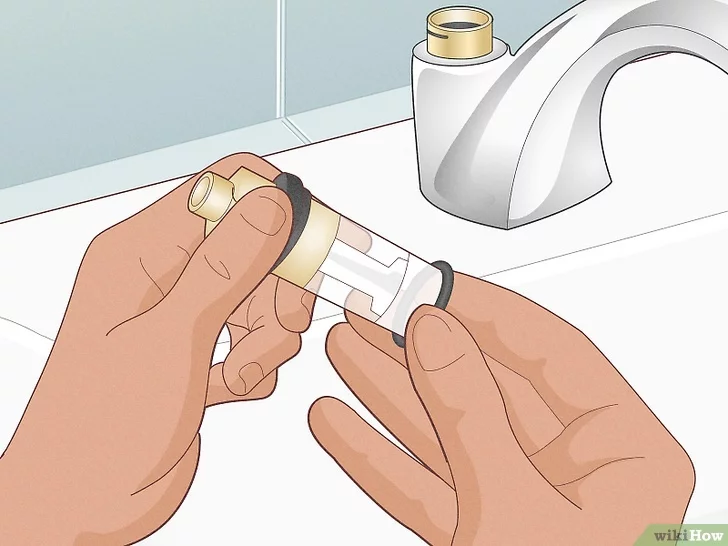
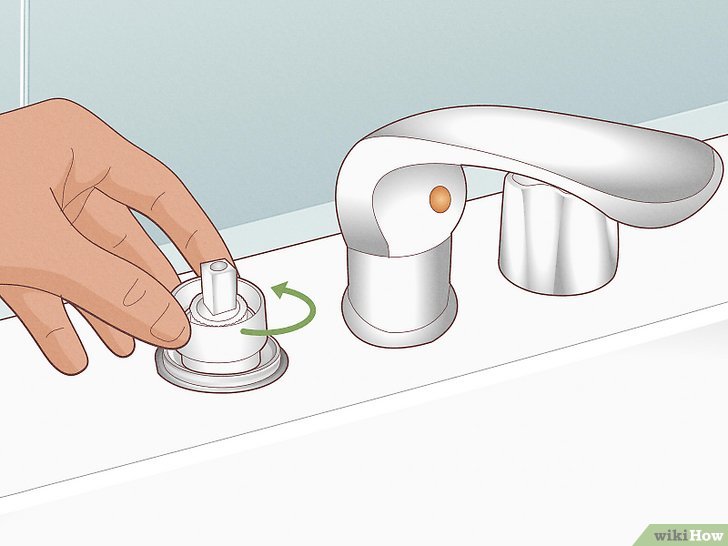
3. Pull the cartridge out or stand it upright.
The cartridge may come out easily, but if it doesn’t, pull it upward until you hear a click. This indicates the position the cartridge occupies when the water is at full blast.
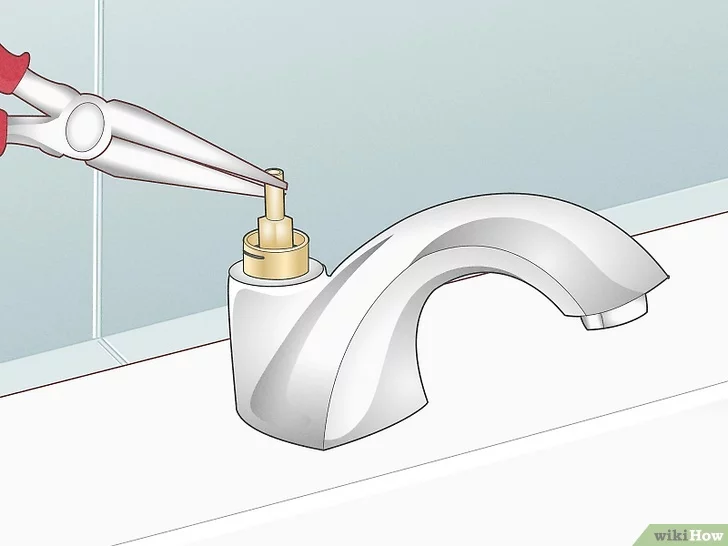
4. Remove the faucet spout if the cartridge doesn’t come out.
Slide the spout upward to detach it from the cartridge and set it aside. Then, locate the O-rings at the base of the cartridge.
5. Replace the O-rings or swap out the cartridge entirely.
If your cartridge appears undamaged and is still inside the faucet opening, simply clean it with a damp cloth and replace the O-ring. However, if the cartridge looks damaged or excessively old, buy a replacement and install it in the opening.
The cartridge will click into place when you insert it, and there’s only one way for it to fit, so you can’t go wrong. Be sure to purchase a replacement cartridge specifically designed for your faucet brand and model.
6. Reassemble the handle and confirm everything works.
The leak should now be fixed. Place the handle back over the cartridge, reinstall the retaining clip if there was one, and turn the water back on to ensure everything functions smoothly.
Method 5
Ceramic-Disk Faucet
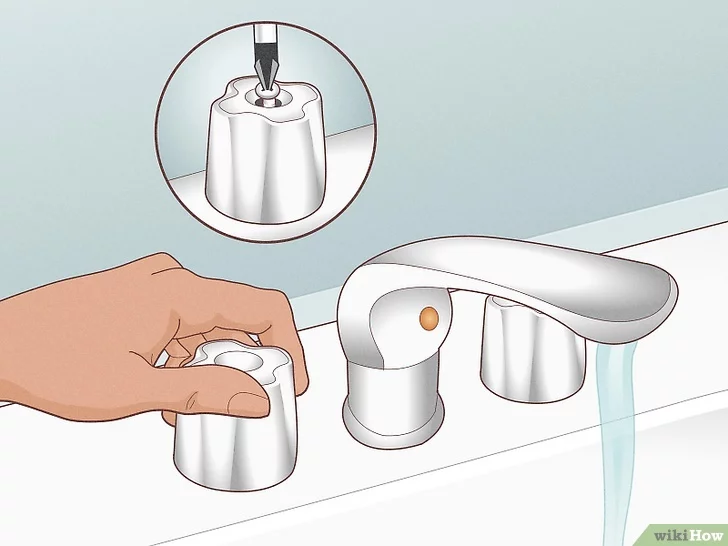
1. Remove the handle and take off the escutcheon cap.
Unscrew the handle by turning it counterclockwise until it loosens, or by removing the fastener that secures the handle. Locate the escutcheon, which is typically made of metal and sits directly beneath the handle. Lift the escutcheon off to expose the cylinders underneath.
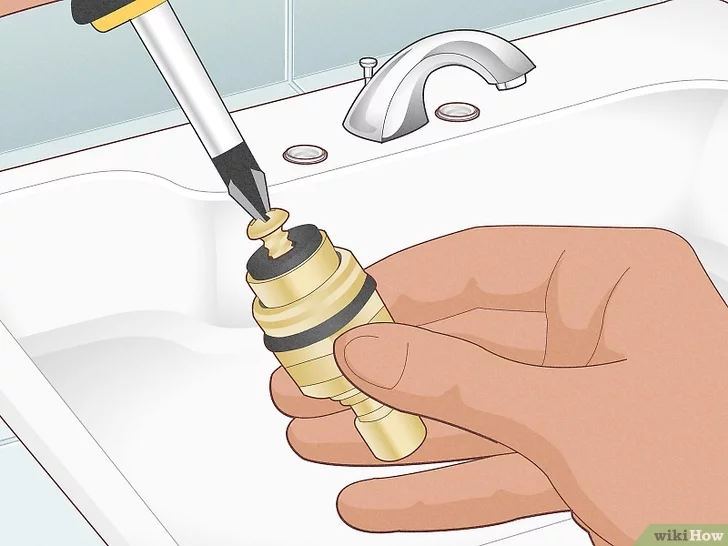
2. Unscrew and remove the disk cylinder.
Each ceramic-disk faucet may vary, but generally, you’ll use a screwdriver to loosen the retainer nut or mounting screw that secures the disk cylinder. Once loosened, lift the cylinder out of the faucet opening.
If your faucet has multiple disk cylinders, remove all of them while noting the arrangement of each on top of one another.
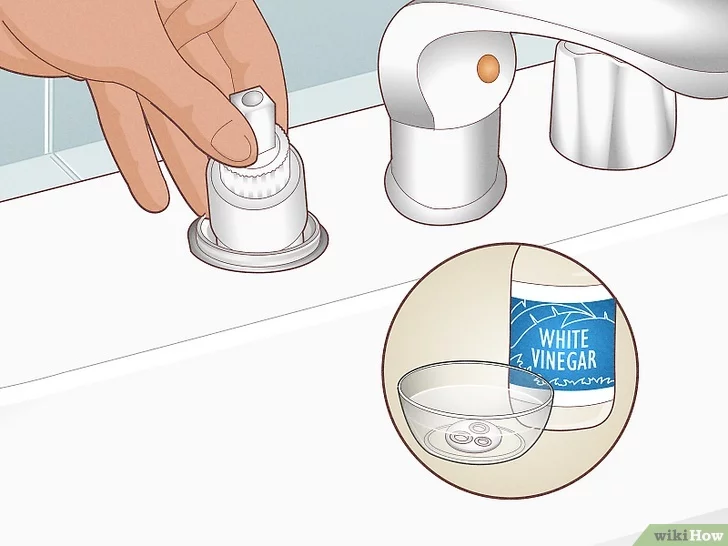
3. Pry out the seals and clean the cylinders.
White vinegar is effective for this, especially if you have hard water. Soak the disk(s) in vinegar for 2-3 hours to help dissolve any buildup, then evaluate whether they are still reusable.
Trust your instincts with the disks; if they appear worn or damaged, it’s likely time to replace them.
4. Replace the seals or the cylinder disk if they appear damaged.
If the seals are pitted, frayed, thin, or otherwise worn but the disk looks fine, just take the seals to a home improvement store to buy replacements. If the disk is also damaged, purchase a new disk specifically designed for your faucet model.
5. Reassemble the handle and turn the water on.
Once everything is in place, put the handle back on, secure it, and then turn the water supply back on to check for leaks and ensure everything is functioning properly.
Maintaining faucets is essential not only for their aesthetic appeal but also for ensuring they function efficiently over time. Proper maintenance can significantly extend the lifespan of your faucets, saving you money on replacements and repairs in the long run. This guide outlines effective maintenance tips to keep your faucets in top condition, ensuring they serve you well for many years.
Regular Cleaning
Use Mild Cleaners: One of the simplest yet most effective ways to maintain your faucets is through regular cleaning. When choosing a cleaner, opt for mild products that are specifically designed for use on metal surfaces. Avoid strong acids or alkalis, as these can damage the finish of your faucet. Harsh chemicals can lead to discoloration, pitting, or corrosion, which not only diminish the faucet’s appearance but can also affect its functionality.
– Here are some examples of mild cleaners suitable for metal surfaces:
White Vinegar – A natural cleaner that effectively removes limescale and stains.
Baking Soda – A gentle abrasive that can be used for cleaning and removing dirt.
Liquid Soap – A mild cleaner suitable for everyday cleaning.
Lemon Juice – Has natural bleaching and cleaning properties and can also eliminate odors.
Alcohol – Can be used for disinfection and removing grease, but should be diluted.
Clean the Faucet Surface: To keep your faucet shiny and free from grime, use a soft cloth or sponge. Microfiber cloths are particularly effective as they can trap dirt and debris without scratching the surface. For stubborn stains or buildup, a mixture of warm water and mild soap can work wonders. Simply dampen your cloth with the solution, wipe the faucet, and then rinse with clean water. Drying the faucet with a separate soft cloth afterward will help prevent water spots and streaks.
When using these ingredients, it is recommended to mix them with water and clean with a soft cloth or sponge to protect the faucet’s surface.
Check Seals
Regular Inspections: The seals in your faucet play a crucial role in preventing leaks. Over time, these seals can age, crack, or become damaged due to constant use and exposure to water. Therefore, it’s essential to conduct regular inspections of your faucets. Look for signs of wear, such as discoloration or visible cracks in the seals. If you notice any issues, it’s advisable to replace them promptly to prevent leaks from developing.
Prevent Leaks: Timely replacement of damaged seals can save you from more significant problems down the line. A small leak can turn into a larger issue if not addressed quickly, leading to water wastage and potential damage to your sink or cabinetry. When replacing seals, ensure you use the correct size and type for your specific faucet model. This attention to detail will help maintain a proper seal and prevent future leaks.
Adjust Water Pressure
Avoid High Water Pressure: High water pressure can be detrimental to your faucets, leading to premature wear and tear. It can cause components to loosen, leading to leaks and other issues. To ensure your faucets operate within an appropriate pressure range, consider installing a pressure regulator. This device can help maintain consistent water pressure throughout your plumbing system, protecting your faucets and other fixtures.
Monitor Water Pressure Regularly: Regularly checking your home’s water pressure can help you identify any sudden changes that may indicate a problem. Ideal residential water pressure typically ranges between 40 to 60 psi (pounds per square inch). If you find that your water pressure exceeds this range, it may be time to consult a plumber to adjust the system accordingly.
Prevent Limescale
Regular Descaling: For faucets that are prone to limescale buildup, regular descaling is essential. Limescale is a hard, chalky deposit that forms when mineral-rich water evaporates. Over time, it can restrict water flow and affect the appearance of your faucet. To combat limescale, consider using vinegar or a specialized descaling agent. To descale your faucet, soak a cloth in vinegar and wrap it around the affected areas. Leave it for about 30 minutes, then wipe clean with a soft cloth. For faucets with aerators, removing and soaking them in vinegar can also help eliminate limescale buildup.
Use Water Softening Systems: If you live in an area with hard water, consider installing a water softening system. These systems can significantly reduce the mineral content in your water, helping to prevent limescale buildup on your faucets and other plumbing fixtures.
Mind Usage Habits
Gentle Operation: How you operate your faucets can greatly affect their longevity. Avoid forcefully turning the faucet on and off, as this can lead to wear and tear on the internal components. Instead, use a gentle touch to control the water flow. This habit not only prolongs the life of your faucet but also helps maintain a consistent water flow.
Educate Family Members: If you have children or other family members using the faucets, it’s essential to educate them on proper usage. Encourage gentle operation and explain the importance of maintaining the faucets. Instilling good habits in your household can go a long way in preserving the functionality of your faucets.
Professional Inspection
Regular Professional Checks: While regular maintenance can significantly extend the life of your faucets, there may come a time when professional assistance is necessary. If you notice any unusual issues, such as persistent leaks, strange noises, or reduced water flow, it’s advisable to seek help from a professional technician. A qualified plumber can conduct a thorough inspection, identify underlying problems, and recommend appropriate solutions.
Schedule Routine Maintenance: Consider scheduling routine maintenance checks with a professional plumber. Regular inspections can help catch potential issues before they become major problems, ensuring your faucets continue to function efficiently. During these checks, a plumber can also provide additional tips tailored to your specific plumbing system and faucet types.
Conclusion
In conclusion, maintaining your faucets is crucial for ensuring their longevity and optimal performance. By implementing these effective maintenance tips—such as regular cleaning, checking seals, adjusting water pressure, preventing limescale buildup, minding usage habits, and seeking professional inspections—you can keep your faucets in excellent condition. Not only will this save you money on repairs and replacements, but it will also enhance the overall functionality and appearance of your home’s plumbing fixtures. Regular attention to your faucets will pay off in the long run, providing you with peace of mind and a reliable water source.
These maintenance methods not only extend the lifespan of your faucets but also help maintain the hygiene of household water.